Saturday 14 December 2013

This Year I have Mostly been Painting....

So as it is coming to the end of the year, it seems that that the done thing on Blogland is to have a wee look back at the year. 

I thought I would start this with a look back at what painting I have completed n 2013. No photos I'm afraid as I don't really have anywhere to take decent photos.

So this year, in no articular order I have painted:

1 LOTR Uruk Hai Battering Ram
1 LOTR Uruk Hai Seige Ballista
26 LOTR Moria Goblins
1 LOTR Cave Troll
2 LOTR Nazguls on Fell Beasts
24 Musketeer Late Roman Unarmoured Infantry
4 Musketeer Saxon Slingers
4 Musketeer Saxon Archers
6 Musketeer Late Roman Late Cavalry (3 Javelin and 3 Archers)
8 Musketeer Late Roman Armoured Cavalry
8 Musketeer Late Roman Cataphracts
6 Late Roman Saxon Characters (all the named ones from the range)
4 Judge  Dredd Miniatures
LOTR Mines of Moria Terrains set.
10 WHFB Dark Elf Harpies
10 WHFB 6th Edition Dark Elf Black Guard
1 WHFB Dark Elf Cauldron of Blood
6 15mm Niksphorian Byzantines (as a test for a future project)
2 Beastmen Chaos Hounds for Mordheim
1 Beastman GOR for Mordheim

So that is 21 cavalry, 2 large flying beasties, 101 Infantry, a few bits of terrain, one large infantry model and some war machines.  That is not a bad haul for a years painting.  

 The best thing about this is that the painting has all been very focussed. I have managed to complete a number of projects, and the rest have all been in the advancement of existing projects.

All the musketeer miniatures have been painted to complete the Impetus Late Roman Army and for Dux Brittaniarum.  I now have about 600 points of Late Romans for Impetus and enough models to supply both sides for an occasional game if Dux Britaniarum.  I now consider the Late Romans finished (hooray!!) and don't really feel the need to paint any more.  I still have all the Arthurian characters waiting to get painted and a few other bits and pieces but as I have enough painted just now I can happily wait until I am in the mood.

The LOTR Uruk Hai were done so that I could run Helms Deep, and the Nazgul on Winged Beast were done so I could try out a few scenarios, which we managed to do.  The Moria Goblins were painted as part of the next phase of my Lord of the Rings project, which is put all the pieces together to do most of the Scenarios involving the Fellowship.

The few Beastmen were done as part of the clubs ongoing Mordheim campaign and were needed as my warband expanded.

The Judge Dredd miniatures were painted for a friend and were the only display quality miniatures that I have managed to paint all year.

Having a focused painting plan is very rewarding as you can see definite progress being made, and completing and progressing projects is a great motivator to get more done.  I usually plan and purchase my painting a year in advance, and next year is already looking pretty full.

So far I have planned:

5 Lovely dark Ages buildings from Grand Manner
Finish some simple terrain to represent the wall of Balins Tomb and the Bridge of Kazad Dum
Acquire and paint a Balrog!
Put together and paint the Amon Hen kit that has sat in the loft for the last 7 years!
Paint enough Uruk Hai scouts to make a decent fight for the Fellowship (that will need to be a lot!)

That is probably more than enough for the first 6 months. To top that off I bought into the recent Aliens vs Predator kickstarter, and that should(!) be delivered in May.  I would also like to paint a few more display quality models as well.

I am also eyeing up a 15mm Field of Glory army, probably from the wonderful Legio Heroica range. My taste in gaming is as always dictated by the ranges of miniatures that I like rather than any particular interest in any period.  Wargaming is about being sociable and having an excuse to get the models that I have been painting on the table.

All this on top of a very busy cycling schedule, and an attempt to sell our house and buy a new one so next year is looking like a busy one!

Wednesday 11 December 2013

A Hard Won Victory...or not!

Game six of the clubs Mordheim campaign rolled around and I was feeling pretty good about it.  Mordheim is one of my favourite games and this campaign has been quite successful for my Beastmen, with two victories under their belt and fairly minimal casualties as well.

There are 5 regular players in this:

My beastmen
Rory's Kislevites
Andy's Sisters of Sigmar
Dave's Marienburgers
Ian's Reiklanders

So far in the campaign Dave has been forced to retire his original warband due to losses and Ian has had to miss a few games. Andy, Rory and I have been present at every game and are probably on fairly  even footing in terms of the power levels of our warbands.

The scenario was straight treasure hunt, in a ruined village.  In addition to this as I had manage to 'mislay' the Amulet of Alex in the last game it was also up for grabs.  There were 6 treasure tokens on the board and we each had to grab as many as we could, with one secretly being designated as the missing Amulet.

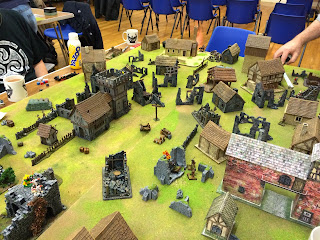
The ruined town, peaceful for now!

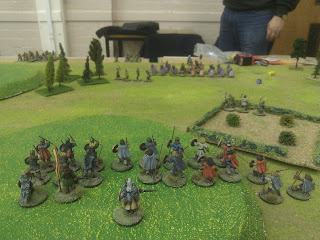
My Beastmen, waiting to get stuck in.
 Once again we decided on random deployment, with Ian and Rory deploying quite closely to each other, almost side by side. Dave was at the far end of the table. Andy was quite lucky and managed to get in the middle of one of the long edges, opposite Ian and Rory and most importantly of all within easy distance of three of the six treasures. I ended up deployed at the far end of the table, well away from the action.
Deployment, just slightly out of the action.
Early game saw an instant start to hostilities between Rory and Ian, who pretty much laid into each other right form the first turn.  This pretty much went on for most of the game, with Ian eventually coming of worse and being the first to exit the game.  Andy quickly took up some high ground in the middle of the board and secured three of the treasures, including the missing amulet.

Kislevites advance

Sisters take up a commanding position in the middle of the battlefield

Early game, you can just see my Beastmen at the far end of the battle.
Dave's Marienburgers also took up a commanding position at one end of he battlefield and advanced towards the Sisters of Sigmar in an effort to try and secure some treasure, which they managed pretty much without anyone noticing.  

My trusty Centigor failed his drunkenness test for the first two turns of the game, basically stopping me from getting very far, but I still managed to secure one of the treasure tokens.  

Mid game saw Dave and Andy fight for possession of the treasures, with neither side gaining much of an upper hand.  Rory tried to consolidate his position after seeing of Ian and started heading towards the centre of the table.  My Beastmen advanced up the table as best they could, taking full advantage of the large amount of cover available.

Sneaking up the board.

Hiding behind every wall.

Still sneaking and hiding.

More sneaking and hiding.
Towards the end of the game I was finally starting to get close to the action when Andy decided to withdraw towards the other end of the table.  Just as I was getting close to the enemy Dave and Andy decided that they had had enough and left the table, leaving only Rory and I in contention.

Finally getting ready for the big charge.

Come back you cowards!
Rory's Kislevites and I then faced off. The only die I had rolled all game was the drunkenness test for my Centigor so I was keen to get stuck in. Rory was one model away from break point so took up a defencive position in readiness.  I managed to get pretty close to him and launched the first wave of my assault, consisting of the chaos hounds and the centigor.  That was less than impressive so in went wave two, but as soon as Rory had enough casualties to allow him he decided enough was enough and legged it, leaving my Beastment victorious!

Kislevites looking a bit nervous.

The Beastmen finally get stuck in!
So victory number three for my Beastment, although not through any effort on my part. Man of the match had to go to Andy as he managed to make off with half the treasure. In the end I lost one Chaos Hound and managed to some pretty decent advances on some of my Heroes.  More of a filler game for me, with not much going on and a chance for wounded to recover and funds to be restored.  With the campaign now past the half way mark the prospect of purchasing a Minotaur are looking pretty remote. How much use he would be this late in the campaign is debatable, but it would still be nice to get him anyway just so I can paint one up!

Game seven in the January. I cannot wait!


Wednesday 4 December 2013

Church Raid

No games for the last couple of weeks so there have not been any updates.

This was my second game of Dux Britaniarum and was a follow up to my game against Dave a few months ago.  This would follow my Saxon Lords raids into the English kingdom of Caer Colun, located on the Saxon Shore on the East Coast of England.

We rolled for the random Raid scenario and I ended up trying to rob an English church. In Dux B most of the various details of the scenarios are generated randomly.  As it turned out the church was located at the far end of the 6x4foot table, with just over half the English defenders arriving mid way up the opposite long edge of the table.  I was lucky and my force managed three full turns of movement before the game started proper.

Early game I sent a unit of Hearthguard and a unit of warriors towards the church to start searching for the loot, while the rest of my force, commanded by my Lord and one of his nobles took position on a hill in a n attempt to keep the English away and buy some time for the church to be ransacked.

The Saxon raiders

One group make for the church, although they forgot their glasses!

Saxons take the hill, ready to stall the English

Two lines of English, good warriors to the front, Levies huddling at the rear.
The English advanced in two lines, with the front consisting of the main warriors and elites, and a second shieldwall of Levies reluctantly forming a second line.

The Saxons reached the church quite quickly and started to look for the loot and it was not long before the two forces clashed on the hill.  The initial combats went the way of the English, with some excellent dice rolling from Dave and some clever use of the Fate Card deck meaning that my Saxon force was depleted very quickly, due to a lot of kills.

Luckily my two units of elite managed to salvage the centre and it quickly became a war of attrition. After three turns I decided to give up the looting of the church as I was running short of men and the group that was in the church came out to join the fight.

The initial clash of warriors. the Saxons came of very badly from this!

Elites take advantage of the poor manoeuverability of the shieldwall.

Running out of troops!

Saxon Lord runs out of troops and decides to make a run for it!
The game went right down to the wire and I eventually managed to break Dave's forces, but I only had one point of moral left myself. The main difference was that I had chased of a large chunk of his force through accumulation of shock, whereas I had had a lot of men killed.  
In the end I only managed a narrow victory, mainly thanks to the extreme amount of casualties I had suffered, while not managing to inflict many in return.

Post game discussion turned to the scenario itself. We both agreed that while we liked the raid scenarios there was not really much point in trying to actually complete them. The chances of them being successful were quite slim and the Saxon forces were strong enough at this stage of the game to just take on the English in a head on fight. Of course the risk of this is that casualties can become a problem. I was lucky in this game as I rolled very high for my initial roll and had a moral of 8 against Dave's five. Otherwise it would have been a disastrous day for the Saxons. Perhaps there needs to be more incentive ot actually try and complete the raid propoerly, although some of them look very dificult to complete!

I still had a good time and am keen to play again, but I don't think that it will be a game that I play a lot of. Perhaps 2-3 times a year.


Wednesday 13 November 2013

The White Rider

Sometimes despite your best efforts things just don't go to plan.

Ian and I had decided to play Lord of the Rings and I was looking to do something a bit different than our usual Rohan/Isengard bashes.

I had recently completed two Nazgul on Fell Beasts ad we decided to find a scenario that would enable us to use them.  The one I found recreated the movie version of Faramir's flight from Osgiliath in the Return of the King.  In the movie Faramir and a few other stragglers are desperately trying to reach the safety of Minas Tirith, all the while being hounded by the Nazgul. In true Tolkien fashion Gandalf rode forth from the white city and helped to rescue Faramir.

For the purposes of this scenario we used a 6x4 foot table, with no terrain, to represent the plains of Pelargir.  At one end of the table was Gandalf, riding out from the city. At the other end of the board was Faramir on horseback, escorted by 4 knights of Minas Tirith, all being chased by 2 Nazgul on Fell Beasts.  

Gandalf rides forth!

Faramir runs for Minas Tirith, hotly pursued.
This was quite a departure from our normal games as it included 2 fell beast and also had three very powerful characters, all of which were spell casters. I really had no idea how to go about playing this, as it was about to become painfully obvious.

The first time we played, Faramir and his escort fled down the table and the Nazgul both decided to black Dart him on the first turn, which killed him outright!  We decided to reset and start again.

Game two was a bit better, and this time I sent some sacrificial knights to stall the nazgul, which they barely managed but in the end it was not to be and the nazgul managed to kill both Gandalf and Faramir!

Game1, Turn 1:  Faramir nailed by a Black Dart.  Start Again!

Game 2:  Still not going great for the good guys

Gandalf buys the farm.

We decided to have a third try and this time swapped sides. By this time we were starting to work out how to get the best out of Gandalf so this  was going to be tricky.  In the end I refused to use the Black Dart until I absolutely had to and even then it did not help. In the third game Ian quite comfortably managed to get Gandalf and Faramir to the gates of Minas Tirith, as well as managing to slay a Nazgul with a nameless Knight of Minas Tirith!

In the end I had one of those nights.  Everything went wrong for me.  I lost just about every fight, and every 50/50 roll-off went Ian's way. Also Ian was very successful at getting off his spells or resisting mine while mine were a disaster.  Just one of these nights I guess.  Still good fun and nice change from our usual Lord of the Rings fare.


I was at Targe at the weekend with my youngest as well, and had quite a good time, but that is a post for another time.

Wednesday 6 November 2013

New Dark Elves

I finally got a chance to try out the new Dark Elf army book that was recently released by GW for Warhammer 8th Edition.

Ian and I had decided to play at 2000points, with a random scenario picked from the main rulebook.

The new Dark Elves now hit a bit harder, but have also got a bit more expensive.  I decided to take a selection of units to try out against Ian's chaos.

I ended up with:

21 Witch Elves
21 Corsairs
10 Cold One Knights
5 Dark Riders
5 Shades
1 Chariot
2 Repeater Bolt Throwers
20 Crossbowmen.

As the scenario was random I took a fairly balanced army. 


In the end we generated the Dawn assault, which forced random deployment of out armies.  the deployment worked out fairly well for me as most of Ian's army ended up on my right, with his heavy cavalry exposed in the centre.

My army performed pretty much as I expected. My witch elves got butchered by a unit of chaos warriors, my shooting was fairly underwhelming against all the armour. The lighter elements of the chaos army were quickly overwhelmed, but the stand out unit for me were the Cold One Knights. They single handed broke the chaos army, wiping out one unit of chaos knights and then getting revenge for the dead witch elves. In the end I managed a fairly comfortable victory, with only one unit of chaos warriors remaining on the table at the end of the game.  Having said that Ian had some terrible luck and the dice really let him down in some crucial combats.

The dark Elves proved to be pretty versatile, with the combination of missile fire, heavy hitters and manoeuvrability proving to be very adaptable.  They were pretty much always that though so no big change there.  The new rules did not come into play that much as the Chaos Warriors have a pretty high Initiative, which makes the advantage seem a lot less.   The Murderous Prowes (re roll to wound roles of 1) only really came into play once in the game, where is saved the chariot from getting squished by some chaos ogres. 

Cold One Knights crush the Chaos centre

The Chaos line advances

Mid Game manoeuvers

Crossbowmen in Danger

End Game, mopping up.


I did not field any of the fancy new toys as I much prefer to field more rank and file troops, so no Cauldron of Blood. I am not a big fan of the Hydras either so I left it at home.

All in all I did not see much difference and do not think there will be much change in how I play my Dark Elves. Corsairs got a bit better, with the Sea Dragon Cloaks getting better and the stupid slaver rule getting dropped. Hand bows also got a bit better a well.  All in all this is a good thing as it was the Corsairs that were my main reason for starting Dark elves in the first place.  The only new units in the book that I am interested in trying out are the Warlocks and the Medusa.  The Warlocks as the rules look quite interesting, and the Medusa as the model is lovely.  In general the models in this release have been a mixed bag.  The new Witch Elves and Rank and File warriors are both lovely. The new chariots are beyond stupid (one wheel?! What were they on when  they designed that?). The new Dark Riders are nice but the horses are not. The new Hydra is pretty nice as well.  I also like the Blackguard/Executioner models as well, but as always with GW the price puts me off investing in any for now.  Perhaps in the future, but at the moment they are too expensive to justify.
  
One thing that was interesting was the selection of the random scenario. This really changes how you select your army as you need to cover all the possible conditions you might come up against. I needed to consider an army that was versatile enough to stand a random deployment, had enough banners to survive or a unit that was the right size to be stationed in a watchtower.  It made for a more interesting game and I think we will play like in the future. 

There are a few of us playing 3rd edition as well, but as far as I am concerned it is just another version of Warhammer, with a few different numbers. it is all about the scenario these days.  especially if you are not sure what scenario you are going to end up playing.  If all you ever played was a pitch battle then the game would get pretty boring pretty quickly.

Tuesday 29 October 2013

Wrath of Rohan

Rory and I had decided last week to have a game of Lord of the Rings, GW's excellent skirmish game.  We did not decide on an actual scenario so this Monday I turned up at the club with everything LOTR related that I own.

After a bit of chat we settled on the "Wrath of Rohan" from the The Two Towers scenario book. This is the part of the book where Eomer chases down and destroys the Uruk Hai and Orcs that had abducted Merry and Pippin at Amon Hen, and where the two Hobbits escape into Fangorn Forest, and eventually make contact with Treebeard, which ultimately leads to the demise of Saruman at the hands of the Ents.

We tossed a coin for sides and I ended up the forces the darkness, while Rory ended up in charge of the heroic Rohirrim, led by the Third Marshal of the Riddermark.

The battlefield after deployment

Orcs and Uruks prepare to receive the charge.

Rohan right flank

Rohan left flank.


As always in LOTR SBG the good side had priority on the first turn and Rory opted to be cautious and do a small advance to allow for some shooting.  This proved pretty effective with some decent early casualties on the Orcs.  The return fire from the Orcs was not quite as effective, only managing to down a couple of horses.

Turn three saw the Roahn crash into the Orc lines on both sides, with pretty devastating effect.


There was not much in the way of sophistication in this game, with the Rohan basically getting stuck in and the Orcs doing their best to survive.  Casualties mounted fairly steadily on both sides until we reached break point.  This is where the bravery of the Rohan came in as they passed all their 'Stand fast ' tests and not a man among them fled the field.  the same could not be said of my orcs, as first the cowardly Grishnakh fled the field, swiftly followed by that entire flank.  I think something like 10 orcs failed their stand fast tests in that single round. 

High casualties on both sides.

The final few turns were pretty quick!
In the end the high moral helped and the orc force slowly disintegrated into nothing, until eventually only Ugluk and a single Mordor orc remained.  Ugluk was dully flattened by an enraged Eomer and the last orc fled the field.

There was some discussion over the victory conditions as both sides had two goals.
Rohan had to wipe out the enemy completely and get the Hobbits safely of the board into Fangorn Forest.  The evil side had to retain control of the Hobbits and reduce the Rohan force to under 25% of their starting numbers.  Rohan succeeded in wiping out the orcs and the orcs succeeded in reducing the Rohan numbers.  Unfortunately the Hobbits had failed to escape the board, but were also roaming free so neither side had succeeded there.  In the end we settled for a draw.

Another great game of Lord of the Rings, and a very close one as well.  I class myself as a novice at this game as I don't get to play it half as often as I would like. There seems to be a lack of interest these days.  Next year I am hoping to expand my LOTR collection beyond the Isengard/Rohan section of the book and have enough to do most of the scenarios involving The Fellowship of the Ring. This will mostly involve scenery, with a few extra models needing painted as well.

THis week the club was quite quiet, relatively speaking. There were only about 25 attendees!  A short time ago that would have been a pretty good club night, but at the moment we have a high membership and the new members have brought a new energy to a Monday, not to mention a new range of games to play. 

No firm game arranged for next week, so will need to wait and see what I end up playing.

Tuesday 22 October 2013

Stuck in the Middle.

Game 5 of our occasional Mordheim campaign rolled in, and it looked like it was going to be another 5 way bash.  

The scenario was that there was a river running length ways down the centre of the table. In the centre of the river was a wizards tower. This tower belonged to one the minions of the eventual end of campaign boss that we were going to have to fight. This minion, who had the profile of a chaos magister was trying to escape the table, protected by 4 skeletons. If we did not stop him from leaving the table we would have to fight him in the final scenario of the campaign.

The table set up

The Evil chappie with his escort.

Present for this weeks game were:

Ian's Reiklanders

Rory's Kislevites

Andy's Sisters of Sigmar

Dave's Marienburgers

My Beastmen Horde
I was a bit nervous about the lack of terrain but the random roll for deployment managed to put me in a corner of the table, slightly out of the way.  The Sisters and the Kislevites ended up deploying right on top each other, with the Reiklander opposite me and the Marienburgers down the other end of the table.   

Early game saw the Sister and Kislevites get stuck into each other and after a few turns of shooting and fighting they both managed to fail their break test and so were out of the game fairly quickly.  The Marienburgers kept a low profile early game, moving towards the tower and taking a few pot shots at the Sisters pet Elf but not much else.  
Kislevites advance of the Sisters of Sigmar


Down my end of the table Ian and I cautiously approached the fleeing evil minion, as the random roll to see what direction he fled in sent him in our direction. In a freak streak of luck that only Rory could manage the evil minion cast Eye of the Gods on himself and promptly rolled a 1. This meant that the gods had taken offence at him and he was taken out of the game, before any of us had even had a chance to get near him.  Ian and I declared a shaky truce and decided to polish of the skeletons.   
The Marienburger'r are a bit sneaky.


Ian quickly broke that truce and as soon as he had taken out the two skeletons on his side of the river started taking pot-shots at my Beastmen.

Reiklanders attack the skeletons before showing their untrustworthy side!

Beastmen get stuck into the Skeleton Bodyguards


This called out for some revenge.  A small fight quickly broke out at the entrance to the tower, on a small Island in the middle of the river. It took a while but I eventually managed to come out on top. I ended up stalled on the river bank with the rest of my Beastmen for a few turns though, allowing Dave's Marienburgers to creep closer and start taking pot shots at me. I decided that I did not fancy getting sandwiched in between two fresh enemy warbands and decided to get stuck into the Raiklanders.  A few charges later and my Beastmen had seen of Ian's warband as he elected to flee the field. 

Stuck in the middle between two warbands.


This left me Dave's Warband to deal with and he approached the back of the river and the two warbands formed a line and faced off against each other.  My Beastment have the longer move so I managed to get of the charge and inflicted some decent casualties, but not without taking a few of my own in return.  We were both on break point and it came down to Break tests.  Dave managed to pass his first ones, and then I managed to pass my first one, despite my Warband Chief being taken out of action.  In the final round of combat I managed to take most of the remaining members of Dave's band out of action, at which point he fled rather than stay and suffer any more casualties leaving the Beastment victorious!

Sneaky Humans!

One down, One to go!


Another excellent game, and I managed to pull of a victory, despite thinking that I was going to get stuffed, especially when there were two warbands closing in on me.  There were a few things that helped me.  All the archery in the game was pretty useless, with only 2 casualties in the whole game from shooting despite a lot of shots coming my way. Ian had it particularly hard, with his arrows hitting lots but failing to wound most of the time. My warband is getting pretty tough now and Strength 3 bows are becoming less of a worry for me.  Also both of opponents lined up nicely for me to get in some very nice charged.  My warband is very limited in scope, but when I get to charge home en mass they are pretty effective, as demonstrated by taking out two warbands in quick succession, thanks to some aggressive tactics.  

Stars of the show this time were the chaos hounds, who did a lot of damage to both opponents. Everything was not all roses though.  The Centigor must have spent at least a third of the game under the influence of alcohol, which is some achievement considering he only has a 1 in 6 chance of that happening.

Casualties were light, with one henchmen killed and one hero missing his next game due to a leg injury. The biggest setback was my leader was robbed of all his gear, which was a substantial amount, including a crucial item for the campaign!   On the plus side I had one Henchman promoted to Hero, bringing me up to the full complement of 6, and get all the loot from the tower, whatever that ends up being.

Another excellent game of Mordheim and I am really looking forward to game 6 of our campaign,which will hopefully be Late November/early December.