Tuesday 30 August 2016

AVP, Updated Rules

The Aliens Vs. Predator game from Prodos games, still languishes in Kickstarter hell.  With Prodos apparently still having Wave 1 and 2 sets to send out, and trying to get Wave 3 approved.  They have gone very quiet recently, with no real updates to speak of, and the thought of seeing the rest of my kickstarter have pretty much been pushed to the back of my head. 
 
At least I have received my copies of the boardgame and a lot of the extras so I consider myself lucky, as there are some who have yet to receive anything.
 
The first edition of the games rules were quite entertaining, if just a little unbalanced and poorly written.  Prodos recently commissioned a few of the games more devoted fans to update the rules, and the V2 rulebook is the result of that.  It has been released as a PDF, with a V2.1 to come out shortly.
 
The main changes to the game have been to clarify a lot of the badly explained rules, and try to balance the forces included in the game to give some kind of internal balance. The main changes were as follows:
 
The marines were pretty much unchanged
The Aliens gained an additional tail attack to beef them up a bit and were ruled to be immune to their own acidic blood (well, duh!!!!!).
The Predators were hit the hardest, with the Smart Disc being downgraded a lot (thanks goodness!) and the number of Predators in the campaign scenarios in the ruled book dropped from 3 to 2. This was a good change as previously the Predators were never under nay kind of threat.
 
The other changes were to the campaign missions, with new objective for each side in the missions, all of which looked pretty achievable.
 
We tested out the new rules on Monday night, with three players that had all previously played the game, with me on umpiring duties. We went back to the start and played Mission 1.
 
The Marines had three objectives:
Close the Vent just outside the cryo chamber
Get to the control centre and retrieve the command codes
Scan the Predator Pod.
These were all pretty achievable as all three objectives were on the Marine side of the board, which meant that they did not need to try and fight their way through the Aliens and Predators.
 
The Aliens objectives:
Damage the armoury
Kill four models
Impregnate the passengers still in cryo stasis by carrying out 3 interact actions in the cryo-chamber (this is where the marine started out).
 
These were also pretty achievable as there was not to far to go on the board to achieve them.
 
The Predator Objectives:
Gain four Trophies
Eject the escape pod to prevent anyone escaping
Damage the engine room.
 
Again all pretty achievable.
 
The game started of pretty quickly, with everyone advancing to try and achieve their objectives, and everyone succeeding in their first one pretty quickly.  Tim's Aliens had a pretty terrible time of it as he could not pass any armour saves early game and lost a lot of models quickly putting him on the back foot.  The marines were pretty much ignored, and apart from a few Aliens approaching and then being quickly toasted by the flamethrower they were left alone to get on with things.  Douglas and his Predator's found themselves swamped by Liens and never managed to move very far throughout the whole game.   In the end the Aliens had a pretty terrible time, with a lot of them dying to the high rate of fire form the Predator weapons, and the rest failing to have any impact in CC, even with the benefit of their CC attack.  


By turn four there were very few Aliens left on the board, and Tim had pretty much abandoned any hope of achieving his objectives and just wanted to actually kill something. John and his Marines had achieved two of their three objectives, and were just waiting for the right time to make a run for the Predator Pod and complete their last objective.  The Predator's were still bogged down fighting the Aliens, and hadn't really moved anywhere. 

One objective to go....


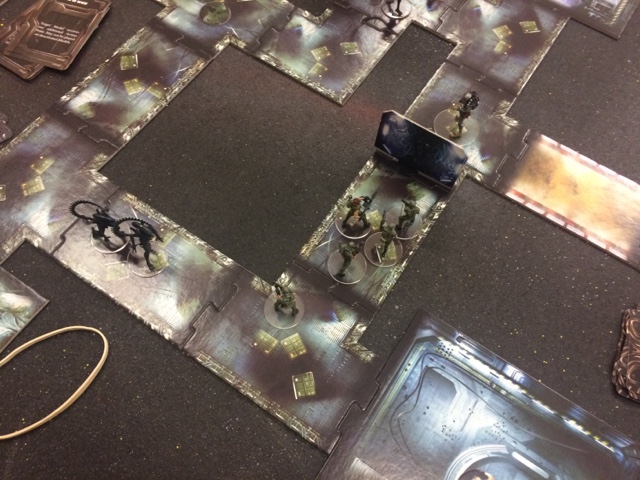
Stuck behind the door!

This is where the randomness of the environment cards had a massive effect on the game. In an earlier turn of the game the player with Initiative had gained the option to place a random door anywhere on the board, and he opted to place it just next to the Predator Pod tiles, so that it would provide cover for his advance and stop his marines being shot to pieces by the Predator shoulder mounted plasma caster and the dreaded Smart Disc.  After the door was placed John advanced his squad round the corner, ready to open the door, rush forward and carry out the scan action required to win him the game. it looked like a sure thing.  Next turn arrived the environment card turned up and it was the door malfunction, meaning that the marines were unable to open the door they had just closed for the rest of the turn.  Douglas couldn't believe his luck and polished of the last Aliens he was fighting and advanced one of his Predators to right behind the closed door.

Caught between a rock and a hard place.


Mopping up

Next turn and the environment card opened all the doors, exposing the Marines to a fierce and slightly smug looking predator. To add insult to injury Douglas rolled a 20 for initiative and proceeded to tear the Marines to pieces. 
 
That pretty much ended the game, with the Predators left standing on the board, with plenty of time to achieve their victory conditions.
 
So was V2 any better?   I would say yes very much so. Two things played a big factor in this game.  the Predators only failed one armour save in the whole game (and they had to make a lot of them!) and the environment cards really ruined the marines night.  Apart from that the game seemed to play a lot better.
 
The Aliens still felt slightly underpowered, but that was probably because of the impervious Predators and some terrible saving throws early game. The marines felt about the same, capable of dealing with the enemy as long as they are prepared from them, but if caught on the hop they quickly fold.  The Predators were quite interesting though, as with only 2 on the board you have to make some decisions. You can either stay together and concentrate on one enemy, in which case you run the risk of the ignored faction achieving their objectives while you are fighting off the other, as almost happened in this game or split up and have a slightly harder time dealing with the enemy but also a better chance of achieving your objectives.   In the end it was hard to tell and the Predators punched well above their weight, while the Aliens well below it, with the marines largely ignored until the end.
 
All in all v2 is much improved, and everyone enjoyed themselves, which at the end of the day is the main objective of this sort of thing.  I will run mission2 in a month or so and see if we can get some more even results, as so far this game has had some pretty extreme results happen every time, which makes it difficult to come to a proper conclusion about it.


Tuesday 23 August 2016

An Epic Encounter

So this Monday I found myself at a loose end but managed to set up  last minute game of Epic.

I forgot to take many photos of this so it wont be much of a write up.

We opted for 3000 points and as it was very last minute and I did not know what my opponent would be facing I selected an already existing list suitable to cope with most situations:

Command Company
Mechanised Company
Tank Company
Infantry Company
Shadowsword Platoon
Sentinel Platoon
Manticore Platoon
Rough Rider Platoon
Hydra Platoon
Thunderbolt Squadron

My opponents force was a bit of a surprise:

Ork Great Gargant
Huge Boyz Mob, fully mechanised
Huge Cult of Speed
Huge Stompa Mob

4 activations.  This was going to go one of two ways.  He was either going steamroller across the board and I would be unable to stop him, or he would stall, allowing me to bring my greater number of activations to build up blast markers and outflank him.

That's a lot of Orks
In the end the latter was the case. I put a row of sentinels across the board at the start of the game to block any movement and the Orks didn't seem to know what to do about them. They marched across the board as far as they could and then stopped, trying to shoot at targets behind the sentinels. This allowed me to bring all my firepower to bear and I slowly started blowing bits of the Ork army. They accumulated blast markers at a frightening rate and in turn two bot the Speed Freaks and Stompa Mob were broken.  Turn three saw a breakdown in eth Guard communication network as a flurry of ones for the activation tests saw the army cohesiveness break down.  The final turn saw the Orks bunched up together on one flank, while the Stompa Mob, having failed to rally for two turns had been reduced to a single Stompa by sustained fire from the Guard Mechanised Company and the Thunderbolts. This allowed the Guard to capture the two objective on the Ork side of the table.

Guard drive of the Stompas
The rest of the guard advanced, trying to contain the orks in the centre of the board, while trying to ensure they cannot take the central Guard objective.   The Tank Company threw itself at the Gargant, stripping it of its shields and starting to inflict some damage, as I mistakenly believed that this was the Orks most expensive formation.  I managed to reduce it to three damage points, thanks to the Shadowsword, but alas at the end of turn thee it still had a few damage points remaining. I lost most of the tank company fro the trouble as well. It turned out it was fairly pointless as the most expensive Ork formation was the Huge Boyz Mob and into the Gargant.  A final sneaky triple move from the Hydra's captured the Ork backfield objective, leaving the guard in possession of all  three Ork objective, while the Orks had nothing, securing a Guard victory.
Less Orks, but still a lot!

An interesting game, and against a very friendly and cheerful opponent. I enjoy epic and its always good to expand the player base a bit further.  Also his army selection was very different from usual, which made fro a different type of game.  I have been playing my Guard fro a while now and need to start at looking at different ways that they can be played.  IN the interest of variety I have also started putting together my Epic Marines as well, and in this case am opting for Blood Angels as they are just about as far from Guard as its possible to get in terms of play style, as they are very aggressive.
 
I'm not sure how long the Marines will take as at the moment I am more interested in painting one off models as opposed to painting loads of the same model. I have been looking a lot at Age of Sigmar as well and recently purchased the Generals Companion, which at £15 is a steal.  I think A review will follow shortly, once I have had a chance to play the game. In the meantime I have been working on my metallic and picked up a Stormcast Eternal from E-bay nice and cheap.  I originally intended to have a bash at NMM gold but chickened out and ended up forking out for the Scale 75 Gold Paint Set, which turned out to be an excellent purchase.  They cover very well and the gold's are nice and strong.  I have always tended to avoid painting gold as I have never found a decent gold paint, but now I have found one I am making up for lost time and hunting about for models that can be painted gold!  Great fun.

Shiny


Side View

Next week we return to the hive as we give the Aliens vs Predator 2nd edition rules a run out to see if they are an improvement.


Tuesday 16 August 2016

Alien Invasion

No, not Aliens vs Predator, but another sci-fi game involving gribbly aliens and human marines.

This time it was Urban War, originally made by Urban Mammoth.  I have recently started thinning out my wargames collection and as a result of this I sold of my Urban War Viridian and VASA.  As a result of this the people I sold the models to, Rory and Dave were interested in getting in a game or two.

Rory and I decided to have a bash, with a fairly sizeable 300points a side.  I opted to use my Koralon this time, as I don't think the Gladiators can really cut it in Urban War, and Rory using his newly acquired (and brilliantly painted! lol) Viridians.  

This also gave me the chance to use my Forward Base terrain, from Antenicitis workshop. I had been itching to get it on the table since completing the basic build earlier in the year. Still lots to do to finish it off but it was done to a standard that made it useable.
The Table

Left Flank Koralon deployment

Right flank Koralon deployment

We opted just to do a "scuffle", which a straight fight across the table with victory going to whomever stays on the board the longest.  Break point this time would be 50%, with the first to reach that level having to pass a command check or leave the table, and then again every time a further casualty was suffered.

The table was 4 foot square, with the Forward base spread across the table and a large amount of scatter for cover.

Having never really used my Koralon in Urban War very much I took a bit of everything:

5 Brood
2 Larvans
1 Larvan Leader
1 Phazon
1 Broodmaster
1 Breeder
4 Reapers

Koralon Gribbly

The Viridians had:

6 Marines
1 Sgt
1 Hvy Machine Gun Team
1 Sniper
2 Special Forces

As neither of us had worked out our lists before hand we went for the minimum calibre we could, to make things easy to remember.

Earl game as predictable, with the Viridians taking up firing positions while the Koralon advanced, hugging as much cover as they could.

Mid game and some shots from the Viridian centre took out one of the Reapers, causing the other three to panic.  On the left the Koralon were still advancing, avoiding any fire they could.  In the centre the Phazon managed to get a warp portal off, putting it slab bang into the middle of the Viridian gun line.  A brood rushed through, trying to take out the Sgt in melee, but failed miserably and was killed for his efforts.  The Larvan decided that he would have a go a charged through, managing to take the Sgt out, sending a ripple of panic through the marine lines.  the Larvan used his follow on action to engage a second marine but unfortunately paid for his bravery and was taken out of the game by a boot knife.   At this point the broodmaster came through the portal, also fluffing his attacks against the lowly marine (who is this guy?!) before narrowly missing being wounded himself, and then panicking.

useless Koralon Broodlord strikes!

On the left the Koralon were finally getting stuck in, although the assault was not going well with several of the assault specialist Brood coming a cropper to marines armed with boot knifes.


The Viridian right flank collapses.

At the end, Viridian patrol have had enough.

Mid to late game and Koralon casualties were beginning to mount, with it taking on average three Koralon to take out any marine model. The Koralon reached and then passed their break point, with only a few good command roles keeping them in the game.  Luckily the rest of the Koralon were now making contact, with the lone remaining Reaper charging and taking out a Marine, and the Phazon himself charging into action and gaining a kill.  This put Rory at his break point and in typical fashion he failed it, leaving the Koralon bloody but victorious.

An interesting game, if a little slow due to us not having played it in a long time (well over a year, it might even have been two).  I've also never really tried the Koralon either and found them to be quite fun, if a little one dimensional.  Certainly more effective than the Gladiators, who I've always found to be sub-par in the game, especially against the likes of the Syntha (duckshoot anyone?).

It was also good to get the Forward Base terrain on the table.  We did not make full use of it, with no on entering any of the buildings, but they certainly looked the part even though they were just stuck on the table to provide some cover.  We haven't played a lot of Urban War recently, and I think it is a game that we will probably re-visit shortly.  While I have a few niggles with the rules (it is too easy to panic, close combat specialists are generally underpowered/overcosted) but it plays quite quickly and is easily completed in a couple of hours, which is good.


Tuesday 9 August 2016

Here Come the Yanks, The Final Showdown.


So the finale of our late war Chain of Command campaign had finally arrived.
 
This campaign has taken a fair old while to get to this point, thanks to various real life pressures, but we made it in the end.
 
We had decided to end the campaign with a "Big Chain of Command" game, with all 6 Platoons taking to the table, with the American making a final assault on the town of Arques, with the Germans trying to hold them off before making an orderly retreat.  The scenario was going to be a flank attack, played on an 8 foot by 6 foot table.

After 6 campaign turns the Platoons were looking like this:

German:

1st Platoon (Kev):  1 casualty, +1 to force Morale
2nd Platoon (John): 1 casualty
3rd Platoon (Ken): 1 casualty

Yanks:

1st Platoon (Ian): 5 Casualties, -2 on Force morale (obviously a killing officer)
2nd Platoon (Dave): 9 Casualties
3rd Platoon (Alex): 7 casualties.

The Yanks rolled for support and got a whopping 28 points!, with the Germans having half that, with 14.

I am not sure of the exact support that the Americans took but they definitely had:

2 Sherman's
1 Chafe
Pre Game Barrage
Flame Thrower.

I don't know what else they had as it never saw the table.

the Germans opted for:

Adjutant to aid with deployment
Pre Game Barrage
81mm Mortar with Forward Observer
Tripod Mounted MG42
Flame Thrower team.

As always with Chain of Command we started with the Patrol Phase. The Yanks had two sets of three patrol markers, one set on their long table edge and one of the German Right flank. The Germans started with five, all positioned on our quarter of the table.
 
The patrol phase went quite well for the Germans, and we managed to push the Yank deployment into one side of the table, while opening it up for the Germans to Push onto the Flanks of the Yank positions.

The Table
the German 1st Platoon opted to take the right flank, close the Yank flanking deployment, with 2nd Platoon in the middle with the mortar spotter to provide fire support and 3rd Platoon on the far left, ready to sweep across the Yanks as they deployed with enfilading fire.  The Yanks opted fro the 1st Platoon to attack from the flank, with the 2nd and 3rd platoons assaulting from the front.
 
Early game saw everyone struggling to get deployed as the pre-game barrages cut off communication and deployment routes.  The Germans and Yanks on the right flank managed to get some troops on the board, as  did the Yank 3rd Platoon. The Yank 2nd Platoon didn't manage to deploy anything early on, as with the Germans 2nd Platoon.
 
Things were slow to begin with as the Germans lacked decent firing positions, and with all the tanks on the board the Yanks could sit back at range and pick us of so the 1st Platoon opted to hide, while the German 3rd Platoon found itself exposed and taking casualties from the main USA assault.  This was brought to an abrupt end when the German 2nd Platoon called in their mortar support, pinning down the entire USA centre, giving the German 3rd Platoon some breathing space.

Yank Deployment
On the right flank things were still bogged down, with the USA advancing cautiously, and the Germans trying to find advantageous firing positions. The German 2nd Platoon had deployed towards the back of the Germans on a hill, and started to take pot shots at anyone that stuck their head out of cover.  A hidden Panzerschrek popped up and tried to take a flank shot at the USA Chafe tanks, but were obviously a bit rushed and missed the tank altogether, at a range of about 30 feet. Off to the Russian Front for you two! 

The Yanks Advance
Mid game and the Yanks on the Right flank started to advance, taking advantage to narrow Germans fields of fire and the cover of the Chafe.  in the Centre the German 2nd Platoon managed to take out a Sherman with a Panzerschrek shot, and kept up their sniping at the USA assault forces.  On the German left things were going badly, with one squad broken and the rest of 3rd Platoon bogged down under USA fire.  Eventually the German 1st platoon Panzerschrek redeemed itself and in a bold move jumped out of a building, braving the USA fire and managed to destroy the Chafe, much to the relief of the rest of the Platoon.    Unfortunately we pretty much ran out of time at this point and had to call it a day. Setting up such a large table, organising three platoons a side and the time it took to play  meant that we just couldn't complete the game, so we had to stop without any sort of real conclusion.
 
It was almost impossible to say who would have won if we had continued.  Two of the three American tanks were gone, taking away their main advantage, but the German 3rd Platoon was under a lot of pressure. I think that the German deployment in depth and the threat of more mortar barrages might have swung, but certainly the German right flank was about to get very messy.
 
In hindsight I think the game was a bit ambitious for a Monday night, as there was just too much to do on the night.  Still an excellent campaign (as always) and many thanks to John fro running it and taking steps to keep it interesting.
 
As to the game itself?  I am not sure that a Big Chain of Command game is possible in 28mm, unless you use a ridiculously sized table.  Even on an 8 x 6 things were cramped, leaving little space for the fire and manoeuver tactics that Chain of Command simulates so well.  In future for normal 1 platoon games we will probably play on a 6 x 6, to give lots of room to move about and give a more interesting patrol phase.  The game probably would have worked well in 15mm, and Chain of Command would work well on a 6 x 4 if played in 15mm, rather than 28.  Having said that I am not about to run out and get a 15mm WW2 force because of that.  the other things is that no one had played the game for a while and we were a bit rusty

Wednesday 3 August 2016

Mordheim Season3, Game 3

Game three of our Mordheim campaign, and we were all trailing into the woods after the Dwarfs, who as the victors in the last game had decided to go deeper in search of treasure. 

We had all the six campaign members this week:

My Undead
Rory Protectorate of Sigmar (PoS)
Andy's Skaven
Ian's Dwarfs
Dave's Marienburg Mercenaries
Andy's Witchhunters
Undead

Marienburg Mercenaries

Skaven Warphunters

Dwarf Treasure Seekers

Witchhunters

Protectorate of Sigmar

The board was mostly woodland, with a few hills and a single hut in the centre.  There was a witch living in the hut, guarding some loot, along with a couple of Dire Wolves. The first person to approach within 8 inches of the hut would trigger the witches break for the nearest random table edge, fighting anyone who gets in her way.

The game started with everyone advancing cautiously.  I ended up deployed in a corner next to the Skaven, and after a quick chat we decided that we would ignore each other so that we could both actually get a chance to have a decent evenings gaming.  I decided to head towards the PoS as they were apparently my nemesis and I would get double experience for any kills.  The Skaven made straight for the hut.  The Witch hunters also went straight for the hut and due to where they deployed triggered the witches escape. Ian's dwarves began the long slog towards the centre of the board, but with a move of 3 inches they were going to take a while.  Dave surprised everyone by advancing into the centre of the board.

The witch made a dash for it and as it turned out they ran straight into the Witch hunters, who set about dealing with her.  Meanwhile the Skaven approached the hut, and my undead made for the PoS.
The Dwarfs kept slogging towards the centre, while Dave also kept advancing.


Mid game saw the Undead lay into the PoS, putting them out of the game, The Skaven found the treasure in the witches hut but ended up coming of worst as the dwarfs finally made it to the centre of the table. 

The Witchhunters had finally slogged it across the table towards Dave's Marienburgers but decided under pressure of missile fire and a charge from his opponent that they did not want to hang about so left, leaving only four warbands on the board.

Having recovered a fair chunk of treasure and starting to come under pressure from the Dwarfs Andy's Skaven also decided to leave. This left the Dwarfs, Marienburgers and Undead on the board.
The Undead had been approaching the Dwarfs, and were now getting into assault range.  The Dwarfs decided that they would form a defensive line and rely on their natural resilience to survive the attack.  The Marienburgers at this point were happy to sit and watch, while sending a few archers off to try and steal some treasure from some zombies skulking at the side of the board.
Zombies "running" away from some nasty people

The Undead had a couple of rounds of shooting at the Dwarfs but this proved ineffective so I decided to get stuck in, even though I expected to come of second best.  The advantage of making that charge was that I could pic my targets, so I ganged up on a few of the Dwarfs, making sure that I took them out of action.  Ian decided enough was enough and after a few casualties decided to leave.
Chasing down the Marienburgers

That left it down to my Undead and Dave's Marienburgers.  There was a chase across the table as Dave reverted o type and started running away again, but he eventually ran out of space and formed a line, ready to attack (why does everyone always  form a line and wait?).  My Undead charged in and in a couple of turns Dave was past his break point and left the field, leaving the Undead victorious.

A nice win for the Undead, with the Vampire finally killing something. A costly one though as I lost a Ghoul, Dire Wolf and Zombie in the post game pages, although I gained some very useful advances on my warband.  I could only afford to replace the ghoul and get some bit of armour for my warband so will be slightly understrength for the next game.  That shouldn't be too much of  a problem though as I got a triple 6 in the exploration phase and managed to pick up a free hired sword for the next game. Given the limitation on what he Undead can hire I opted for an Ogre Bodyguard, so all in all not a bad game really. Once again this was played in a light hearted manner, with plenty of chat going on, which makes for a very enjoyable evening.

The campaign is shaping up nicely, with players being a lot more careful this time. In the last campaign there were usually a couple of players out in the first couple of turns but people are being a lot more careful this time, which is making for much more interesting games.

Next week sees the conclusion of our Chain of Command campaign, "Here Com the Yanks" and we will see if the depleted American Platoon have enough men left to break through the German lines.

Also this Saturday is Claymore, at Telford College Edinburgh, and I am planning on popping along with the kids fro a while. Its usually a fun day out for us all.