Monday 21 December 2015

It's Here!

An early Christmas present arrived today.  

I've been waiting two years for this, and am super excited it has arrived.

It is a very heavy game.   


Lots of work coming up....

Tuesday 8 December 2015

Nelly the Oliphant

Its been a while since I played any Lord of the Rings, and with this Monday being essentially the last full Monday's gaming at the club this year I decided to break out my Haradrim for nice big battle.
 
I have been acquiring Mumakil from e-bay, were you can pick them up for between 20 and 30 pounds if you look for long enough and now have three. I have spent the year gradually painting them up, along with all of the various other bits needed to get them on the table.
 
Deployment
This scenario was fro the Return of the King book by Games Workshop, but expanded enough to allow for all three Mumakil and all the Haradrrim cavalry, versus most of my Rohan cavalry.
 
The Rohan Force consisted of around 60 cavalry, made up of mostly basic Riders but with some Royal Guard thrown in for good measure. Also present was Eomer, suitable ticked off at the death of his Uncle at the hands of a Nazgul, a couple of other captains and some banners.
 
The Haradrim had three Mumakil, each with 12 archers in the howdah, and 2 of them were commanded by Mahud Chieftains, 18 Cavalry armed with a mixture of lances and bows and 5 Serpent Riders. They were all lead by the Serpent King himself.


In the scenario the Rohan get most of the 3ft by 5ft board to deploy their cavalry on, with the Haradrim being limited to a 1 foot strip down their table edge. The Mumakil would enter the game on turns three and four.
 
The Rohan chose to deploy aggressively, with most of their force deployed within charge distance of the Haradrim deployment. The Haradrrim players deployed all their forces on one flank, neutralising the superior Rohan numbers.  Turns 1 and 2 saw the Rohan charge the Haradrim, but the dice were not kind and they suffered a lot of casualties, while failing to inflict much damage of the Haradrim.
 
At the start of turn three the first two Mumakil arrived on the board, with much fanfare.  Luckily the Rohan had moved out of the way and avoided getting trampled by any but the 34 archers on the backs of the Mumakil made their presence felt and Rohan casualties started to mount sharply. 


Turn three saw a change in the Rohan fortunes, with the evil players all starting to consistently fluff their die rolls.  Everyone was starting to declare heroic moves at this point to desperately avoid the rampaging Mumakil, with the good side generally getting the better of them.  The Haradrrim cavalry were getting a bit thin on the ground by this point as well, and by turn 5 only the serpent king and the three Mumakil were left on the evil side of the board.  The Rohan were starting to run out of troops though and just did not have enough men to do the damage they needed to do to the Mumak.


In turn 6 the Rohan force finally broke, although a lot of them decided to fight on regardless.
The Haradrim decided it might be interesting to start firing at the Rohan engaging the Mumakil into combat, but this tactic did not succeed very well as in one volley Stewart managed to inflict 3 wounds on one of the unfortunate beasts with friendly fire.


BY the time we hit turn 8 their were hardly any Rohan left on the board, and certainly not enough to make any serious impact on the rampaging Oliphant's so we called it a night.
 
All in all an entertaining evening, if a little one sided in the end.  The Rohan objective was to kill the Mumakil, and the best they managed was to reduce one of them down to 2 wounds.  When I run this again I will definitely need to beef up the Rohan a bit, perhaps more men or some more Heroes. It is hard to tell though as the Rohan performed so badly in the first two turns of the game that they were fighting a rearguard action for the rest of the night.  It was good to get all the Oliphant's on the board though!.
 

Tuesday 1 December 2015

One of those Nights

This week Frazer and decided to give Sword and Spear another try.  I have had a couple of games, but not for a while and barely remembered the rules.

We opted for 500 points and I went for a Late Roman army list, while Frazer went for German Tribes.

Romans are not exactly cheap, so I managed to squeeze the following inot my list:

4 Heavy Armoured Infantry
2 Medium Infantry Archers
2 Armoured Cavalry
1 Cataphract
2 Skirmishers
1 Light Cavalry
Roman Army ready for action.

Frazer's army turned out to be huge:

8 Impact Heavy Infantry
1 Cavalry
2 Light Cavalry
1 Chariot
4 Skirmishers (2 Javelin, 2 Bow)
7 Medium Infantry
A bucketload of hairy barbarians.


He had 19 units to my 12, which was a bit daunting.

I deployed my infantry on my right, with my cavalry in the centre. My plan was to hold my right  while my Cavalry got stuck in, but the plan was going to struggle against so many enemy units.

Sword and Spear has a slightly different turn mechanic.  At the start of the turn each player takes 1 die for each unit in their army and they are all out together in a bag.  In each phase of the game you remove 7 dice, with each player then getting whichever of those dice belong to their side to use for activation.  Those dice are then rolled, and each dice can then be assigned to a unit, providing the dice roll is equal to or higher than the quality of the troops (4+ is ok, 3+ elite and 5+ for rubbish troops).  Troops are then activated using the die scores assigned, starting at the lowest so quality 3 troops can activate before everyone else, and a score a 5 or 6 will go later in the phase.  Every activated units takes its action until they are all completed, and then you remove another 7 dice from the bag and do the same again. You do this until all the dice have been used, which signals the end of the turn.  Then you put them all back and do it again next turn.

The two armies advanced as quickly as possible and not much happened in the first turn. Second turn we were in missile range and started to take some pot shots at each other, with little effect.


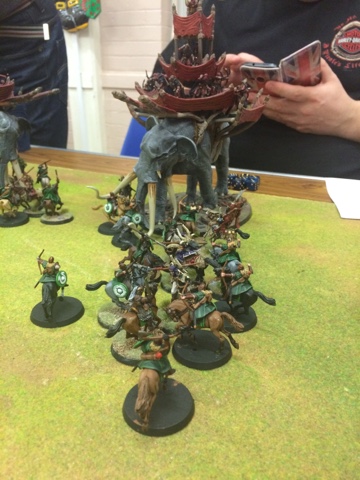
Turn 3 and 4 is where it really went pear shaped for the Romans.  It turned out that the Romans were incapable to winning a single combat and got pretty much stuffed. Even the Cataphracts couldn't do any damage to the incredibly tough German tribesmen. 
Roman left flank is wiped out.

By about turn 4 or 5 it was pretty much all over, with the indestructible Germans breaking the Romans without losing a single stand.
Last couple of Roman units left on the table.

Post game discussion involved the seemingly massive difference in cost between the two forces, with German Heavy infantry being as good as the Roman heavies, but almost half the cost.  As it turns out all the infantry points values in the German list were wrong, and Frazer had in fact been playing with over 600 points. This explained the massive difference in the sizes of our armies, although the way the dice went it probably wont have made much of a difference.  We are going to have another bash at this in the new year and se how we get on.

Sword & Spear has some very simple mechanics, but there are a few things that grate somewhat.

The fact that you can only carry out charges one unit at a time can be a but odd, as if your opponent is deployed in a line you need to pick one brave bunch of soldiers to make the first move.

My biggest bugbear is the difference between undrilled and normal troops, as when your forces are stretched from one side of the board to the other not being very manoeuvrable is not much of a problem (at least so far anyway).

However I have only played 3 games so far so need to play a few more to see if these problems will work themselves out with experience.